Archive for November, 2013


Jsps Part-4…

When you are writing JSP code, a programmer may leave a coding errors which can occur at any part of the code. You can have following type of errors in your JSP code:

  • Checked exceptions: Achecked exception is an exception that is typically a user error or a problem that cannot be foreseen by the programmer. For example, if a file is to be opened, but the file cannot be found, an exception occurs. These exceptions cannot simply be ignored at the time of compilation.
  • Runtime exceptions: A runtime exception is an exception that occurs that probably could have been avoided by the programmer. As opposed to checked exceptions, runtime exceptions are ignored at the time of compliation.
  • Errors: These are not exceptions at all, but problems that arise beyond the control of the user or the programmer. Errors are typically ignored in your code because you can rarely do anything about an error. For example, if a stack overflow occurs, an error will arise. They are also ignored at the time of compilation.

This tutorial will give you few simple and elegant ways to handle run time exception/error occuring in your JSP code.

Using Exception Object:

The exception object is an instance of a subclass of Throwable (e.g., java.lang. NullPointerException) and is only available in error pages. Following is the list of important medthods available in the Throwable class.

SN Methods with Description
1 public String getMessage()
Returns a detailed message about the exception that has occurred. This message is initialized in the Throwable constructor.
2 public Throwable getCause()
Returns the cause of the exception as represented by a Throwable object.
3 public String toString()
Returns the name of the class concatenated with the result of getMessage()
4 public void printStackTrace()
Prints the result of toString() along with the stack trace to System.err, the error output stream.
5 public StackTraceElement [] getStackTrace()
Returns an array containing each element on the stack trace. The element at index 0 represents the top of the call stack, and the last element in the array represents the method at the bottom of the call stack.
6 public Throwable fillInStackTrace()
Fills the stack trace of this Throwable object with the current stack trace, adding to any previous information in the stack trace.

JSP gives you an option to specify Error Page for each JSP. Whenever the page throws an exception, the JSP container automatically invokes the error page.

JSPs Part-3…

The browser uses two methods to pass this information to web server. These methods are GET Method and POST Method.

GET method:

The GET method sends the encoded user information appended to the page request. The page and the encoded information are separated by the ? character as follows:

http://www.test.com/hello?key1=value1&key2=value2

The GET method is the default method to pass information from browser to web server and it produces a long string that appears in your browser’s Location:box. Never use the GET method if you have password or other sensitive information to pass to the server.

The GET method has size limitation: only 1024 characters can be in a request string.

This information is passed using QUERY_STRING header and will be accessible through QUERY_STRING environment variable which can be handled using getQueryString() and getParameter() methods of request object.

POST method:

A generally more reliable method of passing information to a backend program is the POST method.

This method packages the information in exactly the same way as GET methods, but instead of sending it as a text string after a ? in the URL it sends it as a separate message. This message comes to the backend program in the form of the standard input which you can parse and use for your processing.

JSP handles this type of requests using getParameter() method to read simple parameters and getInputStream() method to read binary data stream coming from the client.

Reading Form Data using JSP

JSP handles form data parsing automatically using the following methods depending on the situation:

  • getParameter(): You call request.getParameter() method to get the value of a form parameter.
  • getParameterValues(): Call this method if the parameter appears more than once and returns multiple values, for example checkbox.
  • getParameterNames(): Call this method if you want a complete list of all parameters in the current request.
  • getInputStream(): Call this method to read binary data stream coming from the client.

GET Method Example Using URL:

Here is a simple URL which will pass two values to HelloForm program using GET method.

http://localhost:8080/main.jsp?first_name=ZARA&last_name=ALI

Below is main.jsp JSP program to handle input given by web browser. We are going to use getParameter() method which makes it very easy to access passed information:

<html>
<head>
<title>Using GET Method to Read Form Data</title>
</head>
<body>
<center>
<h1>Using GET Method to Read Form Data</h1>
<ul>
<li><p><b>First Name:</b>
   <%= request.getParameter("first_name")%>
</p></li>
<li><p><b>Last  Name:</b>
   <%= request.getParameter("last_name")%>
</p></li>
</ul>
</body>
</html>

Now type http://localhost:8080/main.jsp?first_name=ZARA&last_name=ALI in your browser’s Location:box. This would generate following result:

Using GET Method to Read Form Data

  • First Name: ZARA
  • Last Name: ALI

GET Method Example Using Form:

Here is a simple example which passes two values using HTML FORM and submit button. We are going to use same JSP main.jsp to handle this input.

<html>
<body>
<form action="main.jsp" method="GET">
First Name: <input type="text" name="first_name">
<br />
Last Name: <input type="text" name="last_name" />
<input type="submit" value="Submit" />
</form>
</body>
</html>

Keep this HTML in a file Hello.htm and put it in <Tomcat-installation-directory>/webapps/ROOT directory. When you would access http://localhost:8080/Hello.htm, here is the actual output of the above form.

First Name:
Last Name:

Try to enter First Name and Last Name and then click submit button to see the result on your local machine where tomcat is running. Based on the input provided, it will generate similar result as mentioned in the above example.


POST Method Example Using Form:

Let us do little modification in the above JSP to handle GET as well as POST methods. Below is main.jsp JSP program to handle input given by web browser using GET or POST methods.

Infact there is no change in above JSP because only way of passing parameters is changed and no binary data is being passed to the JSP program. File handling related concepts would be explained in separate chapter where we need to read binary data stream.

<html>
<head>
<title>Using GET and POST Method to Read Form Data</title>
</head>
<body>
<center>
<h1>Using GET Method to Read Form Data</h1>
<ul>
<li><p><b>First Name:</b>
   <%= request.getParameter("first_name")%>
</p></li>
<li><p><b>Last  Name:</b>
   <%= request.getParameter("last_name")%>
</p></li>
</ul>
</body>
</html>

Following is the content of Hello.htm file:

<html>
<body>
<form action="main.jsp" method="POST">
First Name: <input type="text" name="first_name">
<br />
Last Name: <input type="text" name="last_name" />
<input type="submit" value="Submit" />
</form>
</body>
</html>

Now let us keep main.jsp and hello.htm in <Tomcat-installation-directory>/webapps/ROOT directory. When you would access http://localhost:8080/Hello.htm, below is the actual output of the above form.

First Name:
Last Name:

Try to enter First and Last Name and then click submit button to see the result on your local machine where tomcat is running.

Based on the input provided, it would generate similar result as mentioned in the above examples.


Passing Checkbox Data to JSP Program

Checkboxes are used when more than one option is required to be selected.

Here is example HTML code, CheckBox.htm, for a form with two checkboxes

<html>
<body>
<form action="main.jsp" method="POST" target="_blank">
<input type="checkbox" name="maths" checked="checked" /> Maths
<input type="checkbox" name="physics"  /> Physics
<input type="checkbox" name="chemistry" checked="checked" /> 
                                                Chemistry
<input type="submit" value="Select Subject" />
</form>
</body>
</html>

The result of this code is the following form

Maths Physics Chemistry

Below is main.jsp JSP program to handle input given by web browser for checkbox button.

<html>
<head>
<title>Reading Checkbox Data</title>
</head>
<body>
<center>
<h1>Reading Checkbox Data</h1>
<ul>
<li><p><b>Maths Flag:</b>
   <%= request.getParameter("maths")%>
</p></li>
<li><p><b>Physics Flag:</b>
   <%= request.getParameter("physics")%>
</p></li>
<li><p><b>Chemistry Flag:</b>
   <%= request.getParameter("chemistry")%>
</p></li>
</ul>
</body>
</html>

For the above example, it would display following result:

Reading Checkbox Data

  • Maths Flag : : on
  • Physics Flag: : null
  • Chemistry Flag: : on

Reading All Form Parameters:

Following is the generic example which uses getParameterNames() method of HttpServletRequest to read all the available form parameters. This method returns an Enumeration that contains the parameter names in an unspecified order.

Once we have an Enumeration, we can loop down the Enumeration in the standard manner, using hasMoreElements() method to determine when to stop and using nextElement() method to get each parameter name.

<%@ page import="java.io.*,java.util.*" %>
<html>
<head>
<title>HTTP Header Request Example</title>
</head>
<body>
<center>
<h2>HTTP Header Request Example</h2>
<table width="100%" border="1" align="center">
<tr bgcolor="#949494">
<th>Param Name</th><th>Param Value(s)</th>
</tr>
<%
   Enumeration paramNames = request.getParameterNames();

   while(paramNames.hasMoreElements()) {
      String paramName = (String)paramNames.nextElement();
      out.print("<tr><td>" + paramName + "</td>\n");
      String paramValue = request.getHeader(paramName);
      out.println("<td> " + paramValue + "</td></tr>\n");
   }
%>
</table>
</center>
</body>
</html>

Following is the content of Hello.htm:

<html>
<body>
<form action="main.jsp" method="POST" target="_blank">
<input type="checkbox" name="maths" checked="checked" /> Maths
<input type="checkbox" name="physics"  /> Physics
<input type="checkbox" name="chemistry" checked="checked" /> Chem
<input type="submit" value="Select Subject" />
</form>
</body>
</html>

Now try calling JSP using above Hello.htm, this would generate a result something like as below based on the provided input:

Reading All Form Parameters

Param Name Param Value(s)
maths on
chemistry on

You can try above JSP to read any other form’s data which is having other objects like text box, radio button or drop down box etc.

JSP Life Cycle…

A JSP life cycle can be defined as the entire process from its creation till the destruction which is similar to a
servlet life cycle with an additional step which is required to compile a JSP into servlet.Image
The following are the paths followed by a JSP
 Compilation
 Initialization
 Execution
 Cleanup
The four major phases of JSP life cycle are very similar to Servlet Life Cycle and they are as follows:

JSP Compilation:

When a browser asks for a JSP, the JSP engine first checks to see whether it needs to compile the page. If the page has never been compiled, or if the JSP has been modified since it was last compiled, the JSP engine compiles the page.

The compilation process involves three steps:

  • Parsing the JSP.
  • Turning the JSP into a servlet.
  • Compiling the servlet.

JSP Initialization:

When a container loads a JSP it invokes the jspInit() method before servicing any requests. If you need to perform JSP-specific initialization, override the jspInit() method:

public void jspInit(){
  // Initialization code...
}

Typically initialization is performed only once and as with the servlet init method, you generally initialize database connections, open files, and create lookup tables in the jspInit method.

JSP Execution:

This phase of the JSP life cycle represents all interactions with requests until the JSP is destroyed.

Whenever a browser requests a JSP and the page has been loaded and initialized, the JSP engine invokes the _jspService() method in the JSP.

The _jspService() method takes an HttpServletRequest and an HttpServletResponse as its parameters as follows:

void _jspService(HttpServletRequest request, 
                 HttpServletResponse response)
{
   // Service handling code...
}

The _jspService() method of a JSP is invoked once per a request and is responsible for generating the response for that request and this method is also responsible for generating responses to all seven of the HTTP methods ie. GET, POST, DELETE etc.

JSP Cleanup:

The destruction phase of the JSP life cycle represents when a JSP is being removed from use by a container.

The jspDestroy() method is the JSP equivalent of the destroy method for servlets. Override jspDestroy when you need to perform any cleanup, such as releasing database connections or closing open files.

The jspDestroy() method has the following form:

public void jspDestroy()
{
   // Your cleanup code goes here.
}

JSP Part-2….

Advantages of JSP:
Following is the list of other advantages of using JSP over other technologies:
 vs. Active Server Pages (ASP): The advantages of JSP are twofold. First, the dynamic part is written in
Java, not Visual Basic or other MS specific language, so it is more powerful and easier to use. Second, it
is portable to other operating systems and non-Microsoft Web servers.
 vs. Pure Servlets: It is more convenient to write (and to modify!) regular HTML than to have plenty of
println statements that generate the HTML.
 vs. Server-Side Includes (SSI): SSI is really only intended for simple inclusions, not for “real” programs
that use form data, make database connections, and the like.
 vs. JavaScript: JavaScript can generate HTML dynamically on the client but can hardly interact with the
web server to perform complex tasks like database access and image processing etc.
 vs. Static HTML: Regular HTML, of course, cannot contain dynamic information.

Syntax

JSP pages use several delimiters for scripting functions. The most basic is <% … %>, which encloses a JSP scriptlet. A scriptlet is a fragment of Java code that is run when the user requests the page. Other common delimiters include <%= … %> for expressions, where the scriptlet and delimiters are replaced with the result of evaluating the expression, and directives, denoted with <%@ … %>.

Java code is not required to be complete or self-contained within its scriptlet element block, but can straddle markup content providing the page as a whole is syntactically correct. For example, any Java if/for/while blocks opened in one scriptlet element must be correctly closed in a later element for the page to successfully compile. Markup which falls inside a split block of code is subject to that code, so markup inside an if block will only appear in the output when the if condition evaluates to true; likewise, markup inside a loop construct may appear multiple times in the output depending upon how many times the loop body runs.

The following would be a valid for loop in a JSP page:

<p>Counting to three:</p>
<% for (int i=1; i<4; i++) { %>
    <p>This number is <%= i %>.</p>
<% } %>
<p>OK.</p>

The output displayed in the user’s web browser would be:

Counting to three:

This number is 1.

This number is 2.

This number is 3.

OK.

Java Server Pages (JSPs)….

JavaServer Pages (JSP) is a technology that helps software developers create dynamically generated web pages based on HTML, XML, or other document types. Released in 1999 by Sun Microsystems,JSP is similar to PHP, but it uses the Java programming language.To deploy and run JavaServer Pages, a compatible web server with a servlet container, such as Apache Tomcat or Jetty, is required.

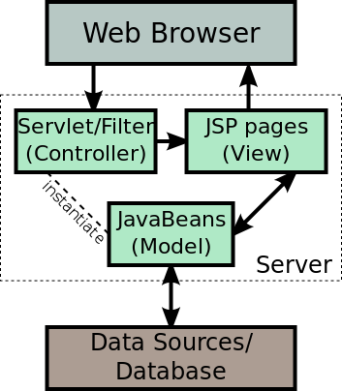
Architecturally, JSP may be viewed as a high-level abstraction of Java servlets. JSPs are translated into servlets at runtime; each JSP’s servlet is cached and re-used until the original JSP is modified.JSP can be used independently or as the view component of a server-side model–view–controller design, normally with JavaBeans as the model and Java servlets (or a framework such as Apache Struts) as the controller. This is a type of Model 2 architecture.Image

JSP allows Java code and certain pre-defined actions to be interleaved with static web markup content, with the resulting page being compiled and executed on the server to deliver a document. The compiled pages, as well as any dependent Java libraries, use Java bytecode rather than a native software format. Like any other Java program, they must be executed within a Java virtual machine (JVM) that integrates with the server’s host operating system to provide an abstract platform-neutral environment.

JSPs are usually used to deliver HTML and XML documents, but through the use of OutputStream, they can deliver other types of data as well.The Web container creates JSP implicit objects like pageContext, servletContext, session, request & response.

Why Use JSP?
JavaServer Pages often serve the same purpose as programs implemented using the Common Gateway
Interface (CGI). But JSP offer several advantages in comparison with the CGI.
 Performance is significantly better because JSP allows embedding Dynamic Elements in HTML Pages
itself instead of having a separate CGI files.
 JSP are always compiled before it’s processed by the server unlike CGI/Perl which requires the server to
load an interpreter and the target script each time the page is requested.
 JavaServer Pages are built on top of the Java Servlets API, so like Servlets, JSP also has access to all
the powerful Enterprise Java APIs, including JDBC, JNDI, EJB, JAXP etc.
 JSP pages can be used in combination with servlets that handle the business logic, the model supported
by Java servlet template engines.
Finally, JSP is an integral part of J2EE, a complete platform for enterprise class applications. This means that
JSP can play a part in the simplest applications to the most complex and demanding.

Servlet Summary…

It is a technology used to create web application.This tech. is robust and scalable and uses java language.There are many interfaces and classes in the servlet API:
Generic
HTTP
Servlet Request
Servlet Response

Advantages of servlet:
There are many advantages of a servlet.tHE WEB container create threads for handling multiple requests.Threads have a lot of benefit over the processes such as they share common memory area,lightweight cost of threads,cost of communication b/w threads is low.

1)Better performance
As they create a thread for each request not processed.

2)Portability
Servlet portability is because it uses JAVA language

3)Robust
Servlets are managed by JVM.So no need to worry about memory leak.

4)Garbage Collection

5)Security
Java provides the security

HTTP Request methods
Every request has a header that tells the status of the client.There are many methods of the request.
GET n POST are the commonly used methods

GET()
this method is used to get the resources at the requested URL

POST()
This method asks the server to accept the body info attached.

HEAD()
this method is used only for the header part.

TRACE()
this method asks for the loop back of the request message.

PUT()
it says to put the resource info at the requested URL

DELETE()
it says to delete the resource at the requested URL.

Differecnce b/w GET n POST
1)DATA
in case of GET limited amount of data can be sent because data is sent in header.
in case of POST large amount of data can be sent because data is sent in body.

2)SECURITY
in case of GET data is not secure since it is exposeed in URL
in case of POST data is secured since it is not exposed in URL

3)
GET request can be bookmarked
POST request can not be bookmarked

4)EFFICIENCY
GET request is more efficient and is used more than post.
POST request is less efficient.

Life Cycle of a SERVLET.
The servlet completes its cycle in 5 steps

1)Loading Servlet Class
2)Servlet instance creation
3)Init() is invoked
4)Service() is invoked
5)Destroy() is invoked

1)The class loaded is responsible or loading the servlet class.The servlet class is loaded when the first request is received by web container.

2)The web container creates the instance of servlet after loading the servlet class.The servlet instance is created only once in the life cycle.

3)The web container calls the Init() only once after creating the instance.The init() is used to initialise the servlet.It is a lifecycle of a method of servlet interface.

4)The web container calls the Service() each time when the request of the web is received.If the  servlet is initialised it calls the service method.Service() takes 2 arguments:

5)The web container calls the destroy() before removing the servlet instance from service.It gives the servlet an opportunity to clean any resources from memory.

Servlet Form Data….

You must have come across many situations when you need to pass some information from your browser
to web server and ultimately to your backend program. The browser uses two methods to pass this information to
web server. These methods are GET Method and POST Method.

GET method

The GET method sends the encoded user information appended to the page request. The page and the encoded
information are separated by the ? character as follows:

http://www.test.com/hello?key1=value1&key2=value2

The GET method is the defualt method to pass information from browser to web server and it produces a long string
that appears in your browser’s Location:box. Never use the GET method if you have password or other sensitive
information to pass to the server. The GET method has size limtation: only 1024 characters can be in a request
string.
This information is passed using QUERY_STRING header and will be accessible through QUERY_STRING
environment variable and Servlet handles this type of requests using doGet()method.

POST Method

A generally more reliable method of passing information to a backend program is the POST method. This packages
the information in exactly the same way as GET methods, but instead of sending it as a text string after a ? in the
URL it sends it as a separate message. This message comes to the backend program in the form of the standard
input which you can parse and use for your processing. Servlet handles this type of requests
using doPost() method.
Reading Form Data using Servlet:
Servlets handles form data parsing automatically using the following methods depending on the situation:


getParameter(): You call request.getParameter() method to get the value of a form parameter.
getParameterValues(): Call this method if the parameter appears more than once and returns multiple
values, for example checkbox.
getParameterNames(): Call this method if you want a complete list of all parameters in the current request.

The following figure depicts a typical servlet life-cycle scenario.
 First the HTTP requests coming to the server are delegated to the servlet container.
 The servlet container loads the servlet before invoking the service() method.
 Then the servlet container handles multiple requests by spawning multiple threads, each thread executing the
service() method of a single instance of the servlet.

Image

Advanced JAVA

Servlets

The servlet is a Java programming language class used to extend the capabilities of a server. Although servlets can respond to any types of requests, they are commonly used to extend the applications hosted by web servers, so they can be thought of as Java Applets that run on servers instead of in web browsers. These kinds of servlets are the Java counterpart to other dynamic Web content technologies such as PHP and ASP.NET.

A servlet life cycle can be defined as the entire process from its creation till the destruction. The following
are the paths followed by a servlet
 The servlet is initialized by calling the init () method.
 The servlet calls service() method to process a client’s request.
 The servlet is terminated by calling the destroy() method.
 Finally, servlet is garbage collected by the garbage collector of the JVM.
Now let us discuss the life cycle methods in details.

The init() method

The init method is designed to be called only once. It is called when the servlet is first created, and not called again
for each user request. So, it is used for one-time initializations, just as with the init method of applets.
The servlet is normally created when a user first invokes a URL corresponding to the servlet, but you can also
specify that the servlet be loaded when the server is first started.
When a user invokes a servlet, a single instance of each servlet gets created, with each user request resulting in a
new thread that is handed off to doGet or doPost as appropriate. The init() method simply creates or loads some
data that will be used throughout the life of the servlet.

public void init() throws Servlet Exception {
// Initialization code…
}

The service() method

The service() method is the main method to perform the actual task. The servlet container (i.e. web server) calls the
service() method to handle requests coming from the client( browsers) and to write the formatted response back to
the client.

Each time the server receives a request for a servlet, the server spawns a new thread and calls service. The
service() method checks the HTTP request type (GET, POST, PUT, DELETE, etc.) and calls doGet, doPost, doPut,
doDelete, etc. methods as appropriate.

Here is the signature of this method:

publicvoid service(ServletRequest request,
ServletResponse response)
throwsServletException,IOException{
}

The service () method is called by the container and service method invokes doGe, doPost, doPut, doDelete, etc.
methods as appropriate. So you have nothing to do with service() method but you override either doGet() or
doPost() depending on what type of request you receive from the client.
The doGet() and doPost() are most frequently used methods with in each service request. Here is the signature of
these two methods.

The doGet() Method

A GET request results from a normal request for a URL or from an HTML form that has no METHOD specified and
it should be handled by doGet() method.

public void doGet(HttpServletRequest request,HttpServletResponse response)
throwsServletException,IOException{
// Servlet code }

The destroy() method

The destroy() method is called only once at the end of the life cycle of a servlet. This method gives your servlet a
chance to close database connections, halt background threads, write cookie lists or hit counts to disk, and perform
other such cleanup activities.
After the destroy() method is called, the servlet object is marked for garbage collection. The destroy method
definition looks like this:

public void destroy() {
// Finalization code…
}

Implementation illustration….

This form takes student information as input and updates the database.

Design :

Source Code :

/*

* To change this template, choose Tools | Templates

* and open the template in the editor.

*/

package gui;

import javax.swing.JOptionPane;

import java.sql.*;

/**

*

* @author aprimit

*/

public class LoginFrame extends javax.swing.JFrame {

/**

* Creates new form LoginFrame

*/

public LoginFrame() {

initComponents();

try {

Class.forName(“com.mysql.jdbc.Driver”);

System.out.println(“Driver loaded”);

} catch (Exception e) {

}

}

/**

* This method is called from within the constructor to initialize the form.

* WARNING: Do NOT modify this code. The content of this method is always

* regenerated by the Form Editor.

*/

@SuppressWarnings(“unchecked”)

// <editor-fold defaultstate=”collapsed” desc=”Generated Code”>

private void initComponents() {

jLabel1 = new javax.swing.JLabel();

jTextField1 = new javax.swing.JTextField();

jLabel2 = new javax.swing.JLabel();

jButton1 = new javax.swing.JButton();

jButton2 = new javax.swing.JButton();

jTextField2 = new javax.swing.JTextField();

jLabel3 = new javax.swing.JLabel();

jComboBox1 = new javax.swing.JComboBox();

jButton3 = new javax.swing.JButton();

setDefaultCloseOperation(javax.swing.WindowConstants.EXIT_ON_CLOSE);

jLabel1.setText(“NAME”);

jLabel2.setText(“College”);

jButton1.setText(“SUBMIT”);

jButton1.addActionListener(new java.awt.event.ActionListener() {

public void actionPerformed(java.awt.event.ActionEvent evt) {

jButton1ActionPerformed(evt);

}

});

jButton2.setText(“RESET”);

jButton2.addActionListener(new java.awt.event.ActionListener() {

public void actionPerformed(java.awt.event.ActionEvent evt) {

jButton2ActionPerformed(evt);

}

});

jLabel3.setText(“BRANCH”);

jComboBox1.setModel(new javax.swing.DefaultComboBoxModel(new String[] { “CSE”, “IT”, “MECHANICAL”, “CIVIL”, “BE” }));

jButton3.setText(“UPDATE”);

jButton3.addActionListener(new java.awt.event.ActionListener() {

public void actionPerformed(java.awt.event.ActionEvent evt) {

jButton3ActionPerformed(evt);

}

});

javax.swing.GroupLayout layout = new javax.swing.GroupLayout(getContentPane());

getContentPane().setLayout(layout);

layout.setHorizontalGroup(

layout.createParallelGroup(javax.swing.GroupLayout.Alignment.LEADING)

.addGroup(layout.createSequentialGroup()

.addContainerGap()

.addGroup(layout.createParallelGroup(javax.swing.GroupLayout.Alignment.LEADING)

.addGroup(layout.createSequentialGroup()

.addGroup(layout.createParallelGroup(javax.swing.GroupLayout.Alignment.LEADING)

.addComponent(jLabel1)

.addComponent(jLabel2))

.addGap(18, 18, 18)

.addGroup(layout.createParallelGroup(javax.swing.GroupLayout.Alignment.LEADING, false)

.addComponent(jTextField1)

.addComponent(jTextField2, javax.swing.GroupLayout.DEFAULT_SIZE, 127, Short.MAX_VALUE)))

.addGroup(layout.createSequentialGroup()

.addGroup(layout.createParallelGroup(javax.swing.GroupLayout.Alignment.TRAILING)

.addComponent(jButton2)

.addComponent(jLabel3))

.addGap(18, 18, 18)

.addGroup(layout.createParallelGroup(javax.swing.GroupLayout.Alignment.LEADING)

.addComponent(jComboBox1, javax.swing.GroupLayout.PREFERRED_SIZE, javax.swing.GroupLayout.DEFAULT_SIZE, javax.swing.GroupLayout.PREFERRED_SIZE)

.addGroup(layout.createSequentialGroup()

.addComponent(jButton1)

.addGap(18, 18, 18)

.addComponent(jButton3)))))

.addContainerGap(202, Short.MAX_VALUE))

);

layout.setVerticalGroup(

layout.createParallelGroup(javax.swing.GroupLayout.Alignment.LEADING)

.addGroup(layout.createSequentialGroup()

.addContainerGap()

.addGroup(layout.createParallelGroup(javax.swing.GroupLayout.Alignment.BASELINE)

.addComponent(jLabel1)

.addComponent(jTextField1, javax.swing.GroupLayout.PREFERRED_SIZE, javax.swing.GroupLayout.DEFAULT_SIZE, javax.swing.GroupLayout.PREFERRED_SIZE))

.addPreferredGap(javax.swing.LayoutStyle.ComponentPlacement.UNRELATED)

.addGroup(layout.createParallelGroup(javax.swing.GroupLayout.Alignment.BASELINE)

.addComponent(jLabel2)

.addComponent(jTextField2, javax.swing.GroupLayout.PREFERRED_SIZE, javax.swing.GroupLayout.DEFAULT_SIZE, javax.swing.GroupLayout.PREFERRED_SIZE))

.addGap(18, 18, 18)

.addGroup(layout.createParallelGroup(javax.swing.GroupLayout.Alignment.BASELINE)

.addComponent(jLabel3)

.addComponent(jComboBox1, javax.swing.GroupLayout.PREFERRED_SIZE, javax.swing.GroupLayout.DEFAULT_SIZE, javax.swing.GroupLayout.PREFERRED_SIZE))

.addGap(20, 20, 20)

.addGroup(layout.createParallelGroup(javax.swing.GroupLayout.Alignment.BASELINE)

.addComponent(jButton2)

.addComponent(jButton1)

.addComponent(jButton3))

.addContainerGap(124, Short.MAX_VALUE))

);

pack();

}// </editor-fold>

private void jButton1ActionPerformed(java.awt.event.ActionEvent evt) {

String u1 = jTextField1.getText();

String u2 = jTextField2.getText();

if (u1.equals(“”) || u2.equals(“”)) {

JOptionPane.showMessageDialog(this, “Fields incompelete”);

} else {

try {

Connection con = DriverManager.getConnection(“jdbc:mysql://localhost/mydb”, “root”, “apmp”);

System.out.println(“Connection established”);

PreparedStatement stmt = con.prepareStatement(“insert into Student (NAME,COLLEGE,BRANCH) values(?,?,?)”);

stmt.setString(1, jTextField1.getText());

stmt.setString(2, jTextField2.getText());

stmt.setString(3, (String) jComboBox1.getSelectedItem());

int i = stmt.executeUpdate();

System.out.println(“query executed”);

System.out.println(“rows affected: ” + i);

con.close();

} catch (Exception e) {

System.out.println(e);

}

JOptionPane.showMessageDialog(this, “Information Submitted”);

}

}

private void jButton2ActionPerformed(java.awt.event.ActionEvent evt) {

System.out.println(“RESET”);

jTextField1.setText(“”);

jTextField2.setText(“”);

}

private void jButton3ActionPerformed(java.awt.event.ActionEvent evt) {

JOptionPane.showMessageDialog(this, “Previous Information will be updated !!”);

String u3 = jTextField1.getText();

String u4 = jTextField2.getText();

if (u3.equals(“”) || u4.equals(“”)) {

JOptionPane.showMessageDialog(this, “Fields incompelete”);

} else {

try {

Connection con = DriverManager.getConnection(“jdbc:mysql://localhost/mydb”, “root”, “apmp”);

PreparedStatement stmt = con.prepareStatement(“Update Student SET College=?,Branch=? where name=?”);

stmt.setString(1, jTextField2.getText());

stmt.setString(2, (String) jComboBox1.getSelectedItem());

stmt.setString(3, jTextField1.getText());

stmt.executeUpdate();

con.close();

JOptionPane.showMessageDialog(this, “Information Updated”);

} catch (Exception e) {

System.out.println(e);

}

}

}

/**

* @param args the command line arguments

*/

public static void main(String args[]) {

/*

* Set the Nimbus look and feel

*/

//<editor-fold defaultstate=”collapsed” desc=” Look and feel setting code (optional) “>

/*

* If Nimbus (introduced in Java SE 6) is not available, stay with the

* default look and feel. For details see

* http://download.oracle.com/javase/tutorial/uiswing/lookandfeel/plaf.html

*/

try {

for (javax.swing.UIManager.LookAndFeelInfo info : javax.swing.UIManager.getInstalledLookAndFeels()) {

if (“Nimbus”.equals(info.getName())) {

javax.swing.UIManager.setLookAndFeel(info.getClassName());

break;

}

}

} catch (ClassNotFoundException ex) {

java.util.logging.Logger.getLogger(LoginFrame.class.getName()).log(java.util.logging.Level.SEVERE, null, ex);

} catch (InstantiationException ex) {

java.util.logging.Logger.getLogger(LoginFrame.class.getName()).log(java.util.logging.Level.SEVERE, null, ex);

} catch (IllegalAccessException ex) {

java.util.logging.Logger.getLogger(LoginFrame.class.getName()).log(java.util.logging.Level.SEVERE, null, ex);

} catch (javax.swing.UnsupportedLookAndFeelException ex) {

java.util.logging.Logger.getLogger(LoginFrame.class.getName()).log(java.util.logging.Level.SEVERE, null, ex);

}

//</editor-fold>

/*

* Create and display the form

*/

java.awt.EventQueue.invokeLater(new Runnable() {

public void run() {

new LoginFrame().setVisible(true);

}

});

}

// Variables declaration – do not modify

private javax.swing.JButton jButton1;

private javax.swing.JButton jButton2;

private javax.swing.JButton jButton3;

private javax.swing.JComboBox jComboBox1;

private javax.swing.JLabel jLabel1;

private javax.swing.JLabel jLabel2;

private javax.swing.JLabel jLabel3;

private javax.swing.JTextField jTextField1;

private javax.swing.JTextField jTextField2;

// End of variables declaration

}